


Google Tag Manager: what it is, why it matters and how to use it
Most people treat Google Tag Manager as a place to paste scripts. Used properly it is the foundation of measurement you can trust.

In short: For most organisations, the only purpose of Google Tag Manager is to get scripts (Google Analytics or Hotjar, for example) onto the website without having to involve a developer.
You can also build events for Google Analytics so you can measure the effect of your marketing.
What is Google Tag Manager (GTM)?
Google Tag Manager (GTM) is Google’s tool for simplifying your web analytics. It is often used alongside Google’s other tools, such as Google Analytics and Google Ads, but it works for any tag.
With GTM you can create events and conversions – for example the number of contact forms submitted, clicks on buttons, outbound links, phone numbers and email addresses.
The really useful part of Google Tag Manager is that in most cases it takes no more than a minute to install. After that you no longer have to go back to a developer every time you want to change something in your web analytics.
How do you install Google Tag Manager?
To install Google Tag Manager you need to add two snippets of code: one in the header and one in the body section. If you use WordPress there are plugins available, although we prefer to place the code directly in the theme or website. As a rule it should sit at the very top of, and first in, those sections. Always make sure you only have one installation.
Below is a step-by-step walkthrough. We assume you already have a Google Analytics account.
Step 1: Create a Google Tag Manager account
Search for “Google Tag Manager”, open the first result, click “Create account” and follow the instructions. The names you choose are not critical, but do name things properly – for example the URL of the website the tag relates to – and select “Web”.
Step 2: Add the GTM code to your website
Google will give you two snippets of code that you need to add to the website. The first one should be placed as high up as possible in <head>. The second one should also be placed as high up as possible in <body>. You may need to contact your web developer or web agency for this step. If you use WordPress there is a plugin available if you want to do it yourself and cannot edit the code.
Tip: developers and web agencies often work in staging environments. If you make this change on the live site, you may need to tell them you have done it so that it does not get overwritten.
Step 3: Check that GTM is installed
If you use Chrome, you can install Google Tag Assistant.
Once you have installed the Chrome extension, do this: go to your website → open the new extension → Enable → reload the page.
Step 4: Create the GA4 configuration
The next step is to create the connection between your Google Analytics account and GTM.
Tags → New → click “Tag Configuration” (a sidebar should now slide out from the right) → click “Google Analytics: GA4 Configuration”
Under “Measurement ID”, enter the ID from Google Analytics.
Log in to Google Analytics and select the right account. Admin → Data Streams → Web → click the stream that has already been created, or click “Add stream”. That is where you will find the “Measurement ID”.
Once you have added the code it will not show up straight away – you first have to click the “Publish” button in the top right to publish your new changes.
Bear in mind that if you have already installed Google Analytics, but not through Google Tag Manager, you now need to remove your old Google Analytics installation. You can check this in Tag Assistant too – it warns you if you have more than one.
Once everything is in place and you have cleared the cache, you should start to see traffic in your Google Analytics account. Remember that you do not see data in real time – you have to wait until the next day for it to appear. If you want to see the data in real time, click Reports –> Real-time.
Step 5: Create events
Now that Google Tag Manager is installed, you can create whichever events you want. Examples of events:
- Form submissions
- Purchases
- Clicks on phone numbers and email addresses
- Newsletter sign-ups
- Visits to the contact page
- Clicks on an important external link
Not every event has to be marked as a conversion. You decide which events become conversions inside Google Analytics → Admin → Events.
Google Tag Manager event for forms
To create an event for a form, do this:
- Step 1: Click “Tags” in the left-hand menu, then “New”.
- Step 2: Give the tag a name, for example “Form_contact”.
- Step 3: Under “Tag Configuration”, choose “Google Analytics: GA4 Event”. Under “Configuration Tag”, choose the GA4 installation you have just created.
- Step 4: Enter the name of the event, for example “Form contact”. It is important that you still understand what it means further down the line.
- Step 5: Click “Triggering” and then the “Plus” sign to create a new trigger.
- Step 6: Choose “Form Submission” and configure the trigger so that it matches your form – see the settings below for an example.
Bear in mind that if you do not make the adjustments shown in the image, every form will fire the trigger. Even a newsletter sign-up form can end up firing it.
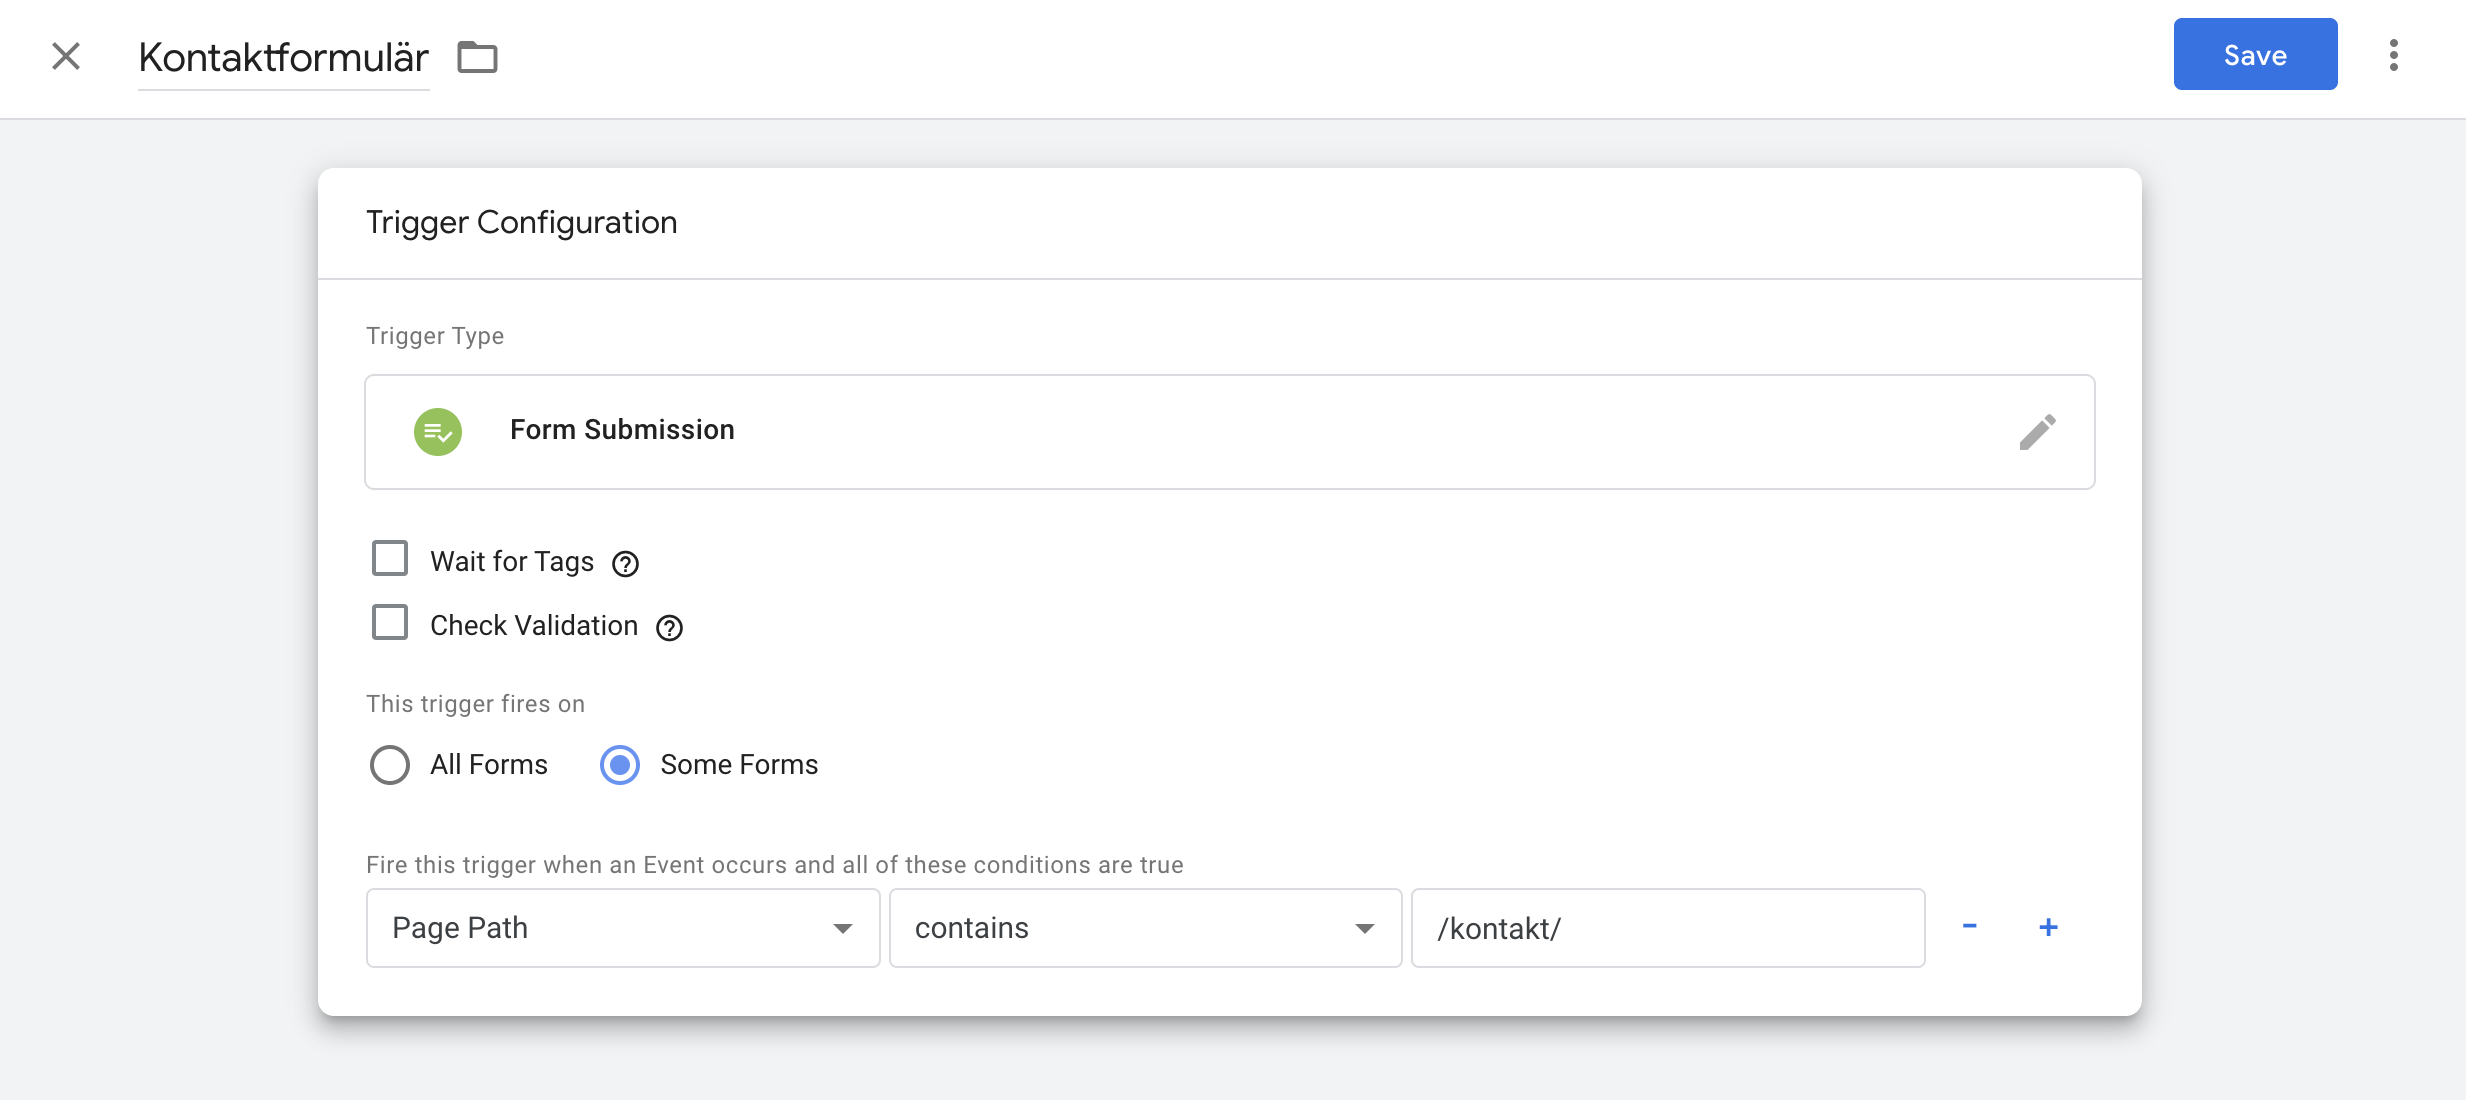
If you have several forms on the same page – a newsletter sign-up in the footer, for example – you need to be able to tell the right form apart. That means looking for something that is unique to the form, such as the URL or the text that appears once the contact form has been submitted successfully.
Remember to test everything in preview mode. Test both successful and failed submissions so that the trigger fires exactly once per successful form.
Once a few forms have come through, you can also check whether the number of submitted events matches the real figures. It is common for the number of leads and the number measured not to match 100%. Some websites, for example, require the visitor to accept the cookie consent banner that appears – if they do not, they fall outside the statistics.
Google Tag Manager event for email and phone clicks
- Step 1: Repeat steps 1 to 3 above
- Step 2: Enter the name of the event, for example “click_email” or “click_phone”.
- Step 3: Click “Triggering” and then the “Plus” sign to create a new trigger.
- Step 4: Choose “Just Links” and configure the trigger
- Step 5: Once you have created all your tags, click “Save”.
- Step 6: Go back to the workspace and click “Submit” to publish your changes.
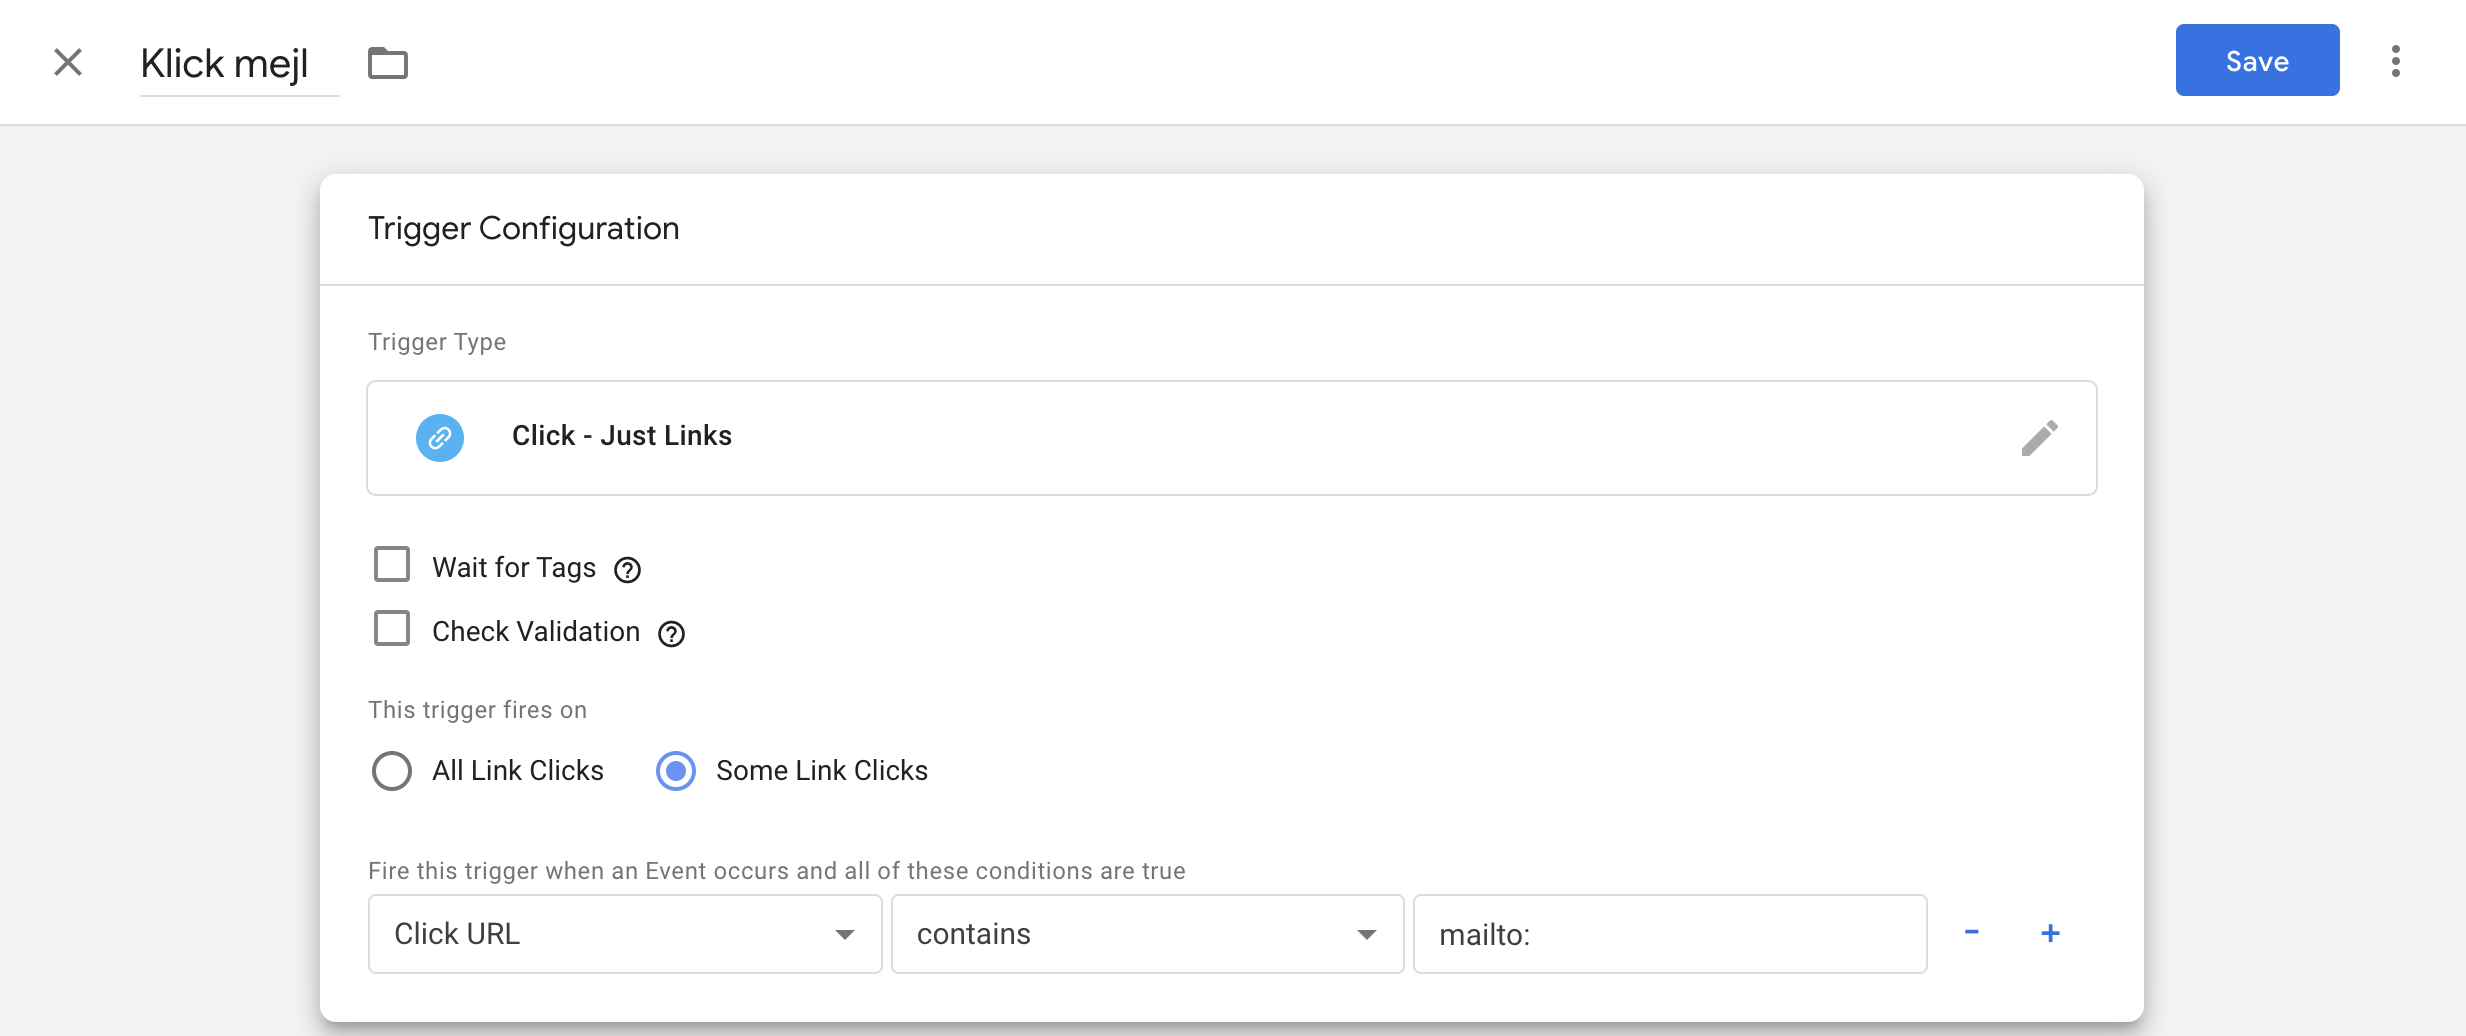
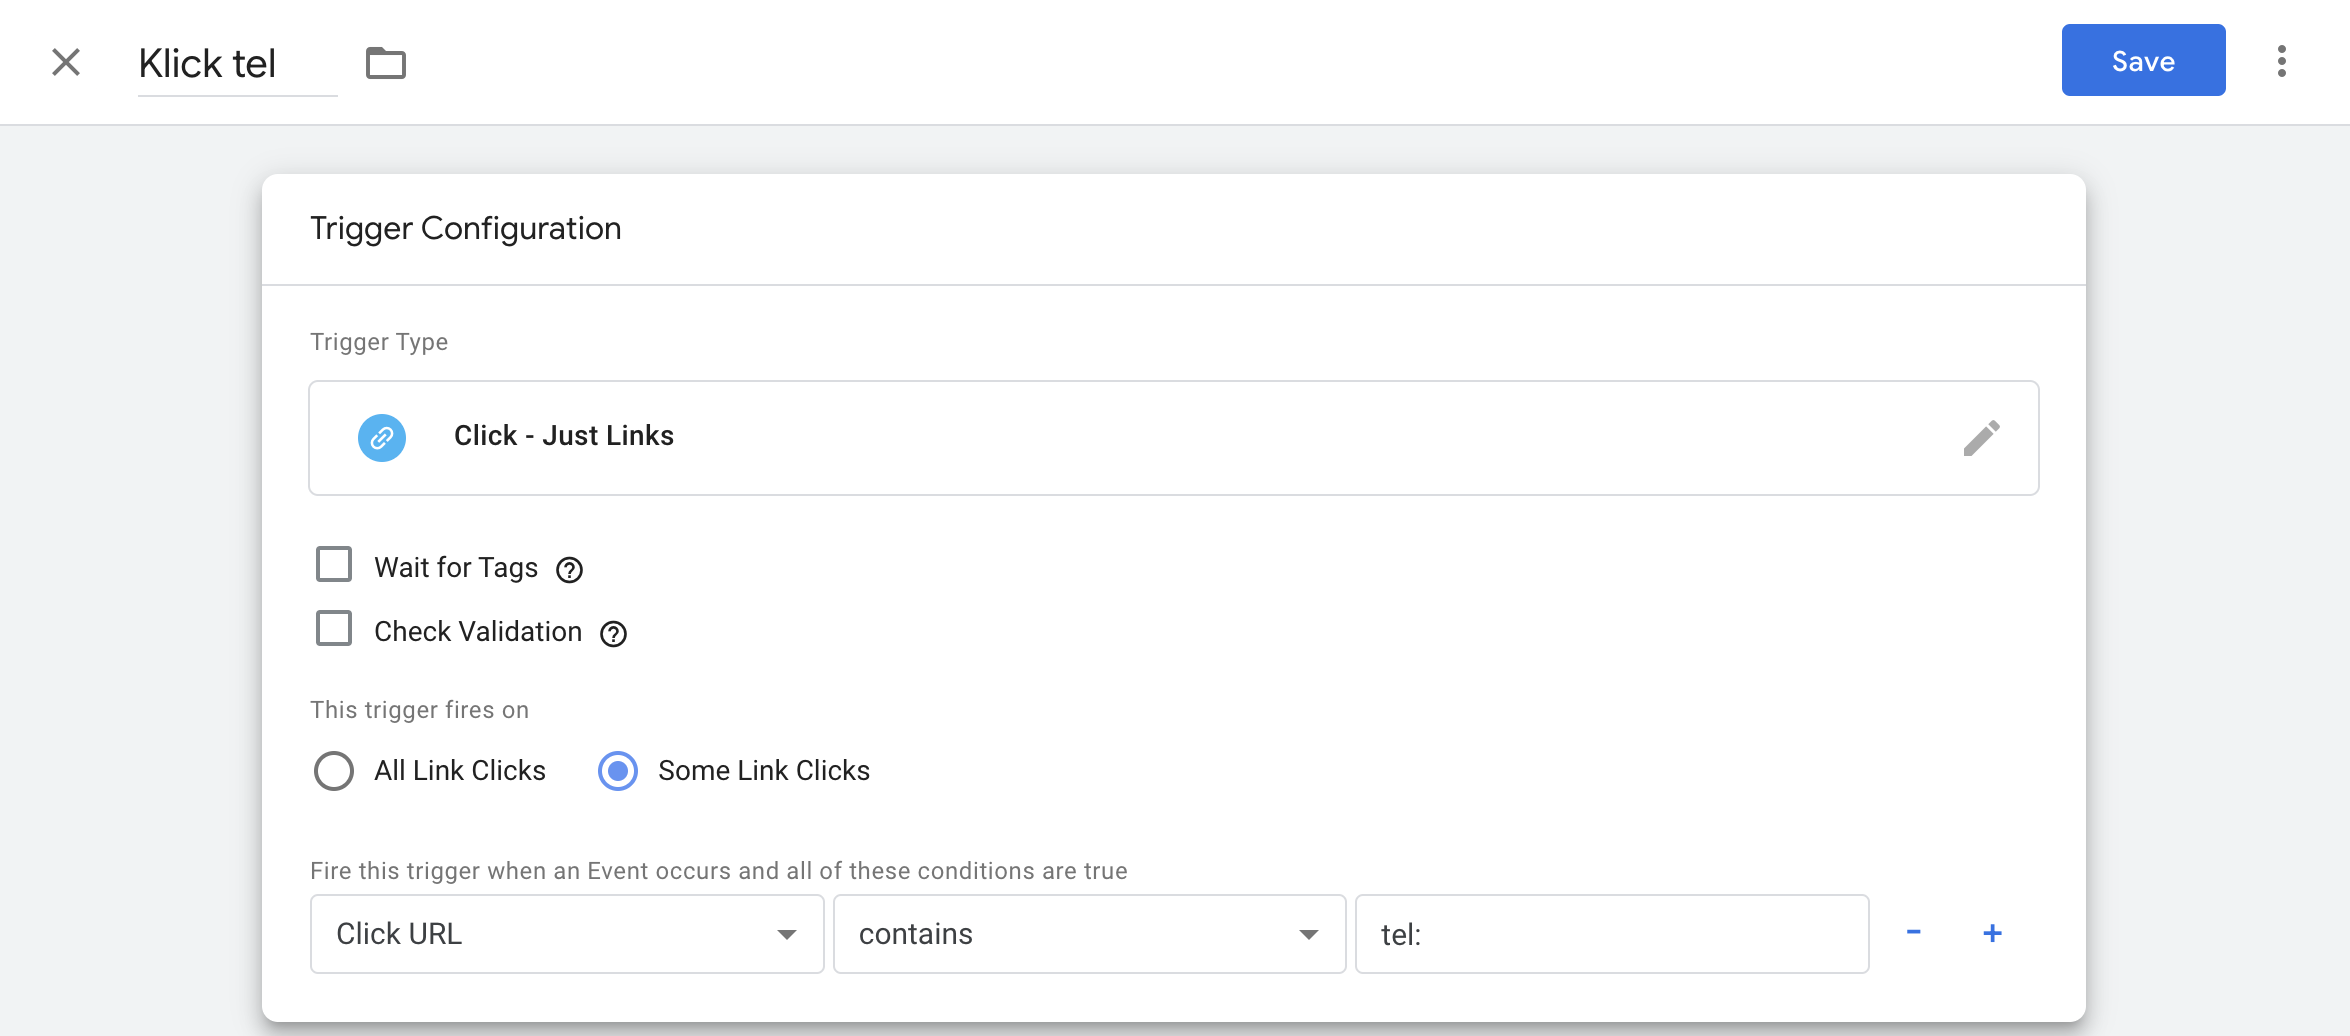
When you are finished, it is important to test all your new tags to make sure they work as expected. If you have any questions or need a hand, we at Sunbird are always here to help. This post was written by me, Nils Fridlund. As an SEO specialist and CEO of Sunbird, I am involved in every project we run and responsible for the final results. If you want to grow your sales and work with a partner that values relationships, do get in touch. Sunbird is an SEO agency with 14 years of experience in search and clients in 10 countries, and we also handle the measurement and analytics work behind setups like the one above.
Frequently asked questions about Google Tag Manager
What is a tag in Google Tag Manager?
A tag is a snippet of code that sends data to another system, for example to Google Analytics or Google Ads.
In practice, that means things like your Google Analytics 4 installation, Google Ads remarketing or the Meta Pixel.
What is a trigger in Google Tag Manager?
A trigger picks up specific events on the website, for example when a visitor lands on a particular URL, sees a specific piece of text or clicks a button. One trigger can be connected to several tags. When the trigger fires, the event is sent – to Google Analytics, for instance.
With GTM you can preview your changes before you go live. That way you avoid sending bad data into Google Analytics and make sure your tracking is correct from the start.
How can I test whether my tags work in Google Tag Manager?
Once you have created all your settings, open preview mode and fire every event you have built. Make sure each one fires exactly once. Also test invalid but similar actions – for example clicking “Submit” on a form you have not filled in, where no lead should be sent.
Which other tools can I integrate with Google Tag Manager?
Google Tag Manager can be integrated with a wide range of tools, including Google Analytics, Google Ads, the Meta Pixel and Hotjar. That makes it possible to centralise and simplify your web analytics.
Is Google Tag Manager free?
Yes, Google Tag Manager is a free tool from Google.